Saturday, September 18, 2010

Seashell Sidewalks

Got seashells?  My sister gave us a bag full of shells from her recent vacation.  The boys had a great time turning these shells into sidewalks for fairies and dinosaurs in one of our herb gardens. Above, you can see a dino 'back in thyme'.
We've done similar seashell gardens before, so we know to expect wild birds to completely wreck it by winter.  The birds pick up the shells, hoping they might still house edible treats.  It is OK.  It will be fun in the spring to find random seashells scattered in the mulch, and the shells are good for the soil.
Most importantly is that this project kept both boys occupied for a few hours. : )

Thursday, September 9, 2010

Sunday, August 29, 2010

Greek Party, Part 5: Games

Parties need games, and lots of them.  A Greek Myth theme fits nicely with the format of a Quest, so we based all of our games on the need to fulfill a Quest.

Quest:  Earn three Drachma in order to play the Game of the Gods
[I found that it was cheaper to use pennies or nickels than it was to purchase fake gold coins. The Game of the Gods is what I called Left-Right-Center.  It is a great party game for this age group --fifth grade.  I got the idea of using LRC from Small Hours and Little Wonders.]

Boys had to win Drachma in a series of challenges given to us by characters in Greek Myths.

Dionysus Challenge #1:
A cookie is placed on each player's forehead.  Holding his hands behind his back, the player needs to try to eat the cookie.  If it drops, the player may pick it up and start over.
[Our winner got his cookie by very slowly and carefully raising his eyebrows and twitching his cheeks until the cookie was on his lips.]

Medusa Challenge:
In teams, the boys had to transfer rubber snakes from one bucket to another, while blindfolded and using only chopsticks (you can't look at or touch Medusa's snakes!).


The Sphinx Challenge:
Using the book What a Beast, by Sophia Kelly, my son read humorous descriptions of mythical beasts.  The winner was the guest who correctly guessed the most beasts.

Arachne's Challenge:
The boys sat in a circle.  One boy wrapped yarn from a ball around his ankle (loosely), and then tossed the ball to the boy who followed him alphabetically. The winner was the first boy who could not wrap the yarn because the ball ran out.  What a tangled web! (See their togas in the picture below...they did such a great job with their costumes. You can even spy Eros's wings.)

Dionysus Challenge #2:
We split up into two groups.  I gave each group a brief myth for them to act out.  Three judges (my two young party-helpers and myself) voted on the best skit to win.  I wasn't sure how the boys would like doing an activity that involved reading, but they loved putting on the skits.  For this challenge, I chose the stories of Daedalus's wings and Theseus vs the Minotaur. Both stories related to the labyrinth, and I wanted the guests to be familiar with the story so they'd better appreciate the labyrinth challenge which comes later in the quest.  Kid-friendly versions of the myths can be found online.

Zeus Challenge:
Toilet paper togas!  Need I say more?
Teams worked within a time limit to dress one team member in a toga that would stay on by itself.

Hercules Challenge:
We hid symbols of each of Hercules 12 Labors in the yard and teams competed to find the most.
I got the idea for using the 12 Labors from this site.
Our gang had to find a lion, a hydra, a stag, a boar, a sponge and dustpan (to represent cleaning the stables), birds (we hid ten), a bull, mares (we hid 17), a belt, cattle (we hid nine cows), an apple, and Cerberus, the three-headed dog.  Most of what we hid were toys we had (we have toys of Cerberus and the hydra, believe it or not), but pictures would work, too.  The apples had to be picked from our trees (took the boys a while to figure that out).  A list of Hercules' labors can be found online or in the book Oh My Gods, by Megan Bryant.

Dionysus Challenge #3:
My helpers (my daughter and niece) hid a cookie in a plate of whipped cream for each boy.  Hands behind the back, the first boy to find the cookie with his mouth was the winner.  The boys quickly realized that the 'real' winner was anyone with a face full of whipped cream!

Theseus Challenge:
Find the toy minotaur hidden in the labyrinth!

After the challenges, all of the boys had enough coins to play Left-Right-Center.  It was lots of fun. We followed the game with cake and presents.  The boys then played outside in the labyrinth until pick-up time.

Greek Party, Part 4: Creating the Scene

To transform our home into Ancient Greece, we started at the front door.  A while ago, I went a little crazy with chalkboard paint, so I have many of these framed surfaces from the dollar store.  Earlier this month, we happened to go on a lucky yard sale expedition with my parents...at four or five of the yard sales we hit that day, my kids found Happy Meal toys from "Hercules".  Those toys came in handy for the party!
We put a few more yard sale characters around the Temple of Party Favors.

For lunch, we served olives (my kids love putting black pitted olives on their fingers before eating them), ambrosia (marshmallows, pineapple, pear, Cool Whip, cinnamon and nutmeg---gross, but delicious!), fruit, pita bread sandwiches (make-your-own, with lunch meat, hummus, mayo, cheese, etc.), and junk food (of course!).  We made up labels for the food, such as "Poseidon's Goldfish" and "Hydra Necks".
The Nectar was a sherbet punch made with rainbow sherbet, ginger ale, and pineapple juice.  The cake was a trident (my son dressed as Poseidon).

Perhaps the most exciting part of the decorating was creating a labyrinth in our back yard.  While researching for this party, I learned that what the ancient Greeks called a labyrinth is actually what we now refer to as a maze (who knew there was a difference??), so I used a simple 7 X 7 grid to create a maze.  I found that any size smaller than 7 X 7 created a maze that was just too simple to solve. Each of our panels were about 30 inches, and we made many of the panels 'double length' to use less bamboo stakes.

Using a 300ft plastic table cover roll, I cut panels to secure onto bamboo garden stakes, which can be purchased at a garden supply store at very low cost.  I punched holes on the sides of each panel and fed the bamboo stakes through the holes. We used tape to make a small flag under the top hole so that the panels would not slide down the poles.
My husband and son put paneled stakes into the ground, following the maze plan I drew on graph paper.

We had two problems with the labyrinth.
One is that our cat would not leave it alone.  She needed to be kept inside during the set-up and party.  Some panels needed to be taped where her little claws made their mark!
The other problem was the wind.  It wasn't strong enough to knock down the bamboo, but we had to tell the boys that if they were in the labyrinth when the wind blew, they should just stand still and wait for it to stop (as opposed to pushing against it and possibly tearing it).
  They did a great job following that advice.  It was kind of funny to see them all 'freeze' when the wind started up.
The labyrinth was a big hit, both during the party and afterwards.  The boys used it for a game during the party, but after the party, kids used it to play house, to play hide-and-seek, and even to try to navigate once it got dark.  Even the adults were having a great time with it.

Greek Party, Part 3: Costumes and Cake

COSTUMES

Using a headband and some sparkly leaves, it is easy to make a laurel wreath for a costume. (The blue and green sparkly sticks are seaweed for Poseidon.)
I used clear tape to wrap the leaf stems around the headband.  If this was something I wanted to keep for a long time, I'd use floral tape, but I was aiming to just use this wreath for the party and perhaps reuse the materials afterwards.
Poseidon's crown had the wavy blue and green sticks (which I removed from the stems) to give the illusion of ocean waves.  With a green toga on top of his light colored shirt, it looked great.  (There are lots of web sites describing how to don a toga, so I won't post that here.)
For his trident, I cut sparkly foam (it came with a sticky backing) for the front and back, and stuck the front and back together on a wooden dowel.  Couldn't be easier!
I added more of the wavy sticks to the base, once again to give the idea of water.

TRIDENT CAKE

My son wanted a spice cake trident for the party.  Normally, we like to bake from scratch, but I have found that to shape a cake, using a box mix is best.  Cakes from a mix tend to be quite sturdy.
I baked this cake in a 9 X 13 glass dish.  The top part of the trident was cut from the rectangle; from the discarded pieces, I shaped the bottom 'stick' of the trident.
Using a serrated knife, I sliced off the edges and top to make the two parts match.
For the icing, once again I find that store-bought icing is sturdier than home-made.  First, I added a crumb layer.  Then I added a top layer of icing and decorated the cake with colored sugar, green for the top and brown for the stick.  I sprinkled blue all over the cake and the tray.  To add details, I used sparkly gold gel.

Thursday, August 26, 2010

Greek Party, Part 2: invitations and sources

Our Greek Myth party invitations were extremely simple. 
Not being able to find good clip art for Greek Myths, I stuck with simple columns to frame the page. 
The columns help conjure images of Greek temples. I used the font Castellar, but I'm sure there are more ancient- Greek-looking fonts out there on the web.
The invitations read:

Come Celebrate _____'s Birthday With Us
on ______(date)
We're going to party like it's 500 B.C.
If you can come 'in character', please do.
Consult the Oracle (enclosed) to learn your destiny.

Included in each envelope was a smaller envelope, marked "THE ORACLE".
Inside each Oracle envelope was a brief description and picture of a Greek god. 

We assigned each guest a different Greek god.  My son, of course, wanted to be Poseidon (who figures prominently in the Percy Jackson books).

So far, the invitations have been a hit and most guests have replied that they will come in costume!

Sources
There are a few other blogs on the web that describe Greek Mythology parties (or Percy Jackson parties).
Here are some that I used for inspiration:
Small Hours and Little Wonders for a detailed Percy Jackson party with lots of game ideas
Bright Hub for generic Percy Jackson ideas
eHow for generic ideas for a Greek Myth party
Make It Do for a detailed description of a Percy Jackson party (great cake picture!)


Wednesday, August 25, 2010

Greek Party, Part 1: Goody Bags

My son loves Greek Mythology and has been asking for years to use it as a theme for a birthday party.  I distracted him with other themes (what kind of seven year old has a toga party?), but now that Percy Jackson has made mythology popular again, the time has come.

I searched the web for ideas and found very few that were appropriate for the pre-frat-party crowd.  Over the next week or so, I'll share what I've found online as well as my original ideas for throwing a Greek Mythology party for kids. 

Let's start with GOODY BAGS!
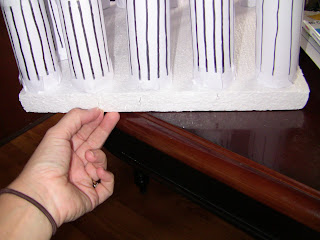
You will need toilet paper tubes (or any tubes cut to that size), white paper, a marker, scissors, glue, Styrofoam pieces for the base and ceiling, and straight pins.
Using Martha Stewart's advice for egg dying, I have foam boards full of pins.  For this project, I'll remove the pins and flip the foam over so that no one can see those splotches of dye.
(It will get put back with the Easter decorations after this party.)
Cut the paper to fit the size of the tube; then glue the paper to each tube.

Draw lines on each tube.  Cut paper circles to tape on each end (but only tape one end right now).

Fill each tube with goodies.  I included a variety of candy, including a candy eye-ball to represent the eye of the Fates, a snake to represent Medusa, and a labyrinth I downloaded from the Percy Jackson web site.

To secure the pillars, I inserted pins diagonally up through the foam and into the bottom of each.

I also added one pin through the top of each pillar. This temple of goody bags will be moved several times between now and the party, so it needs to be somewhat stable.

Finally, I pinned a triangular sheet of paper on the front and back of the temple to complete the look. 

Thursday, August 19, 2010

Harvest Shot

Spent some time outside with the boys picking blackberries this afternoon. I suspect that this basket would be full if the boys weren't sneaking so many into their mouths!
Now our fingers are pink as a fun reminder of the harvest.

Monday, August 16, 2010

Harvest Shot

Things are starting to get busy around here! We've pulled in several pumpkins and countless tomatoes.  Here are some more, stacked with potatoes in some very handy Clementine crates:
When the dining room table and most of our kitchen counters are covered in produce, it is time to start canning.
So far, all we've had time to do is can one batch of tomatoes.  We were up to our ears in blueberries and blackberries last month, but we froze them.
I'm not sure what we'll do with our eggplants...especially the one that has two little growths for arms.  How could we resist adding eyes?
He's our new pet.
I'm sure this will provide a nice excuse for why the kids won't eat eggplant now.

Tuesday, July 27, 2010

Magic Sticks

Have a cousin with us this week, so I was lucky to find inspiration on Crafy Crow for this fun activity today...painting sticks!
The kids searched for sticks and then had a great time painting them. Without any direction, they were free to use their imaginations.  Their sticks turned into magic wands.  (We never tire of Harry Potter in this house.)
One stick became a rainbow for a lucky garden gnome.

Wednesday, July 14, 2010

Fairytale Garden Update

The Fairytale Garden is doing well.  The Magic Beans are climbing everywhere. The 'pole beans' sign is barely visible in the picture below.  Some new bug is eating the leaves, but it hasn't stopped the beans from growing.  (New Bug is yellow and spiky; the chickens won't even eat this strange creature, so I'm hoping he just goes away.)
The Cabbage Patch is gorgeous.  Having never grown cabbage before, it is a thrill to watch the purple leaves form cabbage heads.  I've weeded out some of the crowded plants; the chickens love them. The primary reason for growing cabbages is to feed them to the chickens.  I enjoy purple cabbage, but my family does not much care for it. The plants add a nice color to the garden, so I'm glad to have them, even if the chickens and I will be eating them alone.
Cinderella's pumpkins are starting to grow.  Additionally, some of the squash we planted with the pumpkins are growing nicely.
The potato plants are starting to die off, which is good.  That is exactly what we've read they should do.  (It is always a relief when the plants have read the same gardening web sites as the gardeners.) 
We've seen a few fruits on these plants, which surprised us. Who knew potato plants made fruit?? The fruits look like green tomatoes, but we've read that they are toxic and not too common.  The potatoes are teaching us plenty, as we are new to growing them.  They are also the most controversial member of the Fairy Tale garden, since they are not an obvious character in any popular fairy tale.  It has come to our attention, though, that they are popular in folklore, having sparked Mr. Potato Head, hot potato, "one potato, two", and more.

Tuesday, July 13, 2010

Harvest Shot

We often quiz the kids at dinner, "What on your plate comes from our garden?"
 For dinner last night, we had an egg frittata with parsley, roasted potatoes, carrots, and zucchini, and a sweet ending of yogurt topped with blackberries, blueberries, and wineberries (not shown in the above picture--as I was mixing the berries with sugar and cinnamon, I sent my oldest child to go gather a cup of them from the woods; wineberries are the wild cousins of raspberries and are plentiful around here).  The pole beans will be dinner tonight.  : )

Sunday, July 11, 2010

Camp Gramp Beads

If there is one group of things our family has collected over the years, it's beads.  I've written before about our fuse bead collections (now, thankfully, put to good use!).  Today I share with you what we do each year at Camp Gramp with all of our other beads.
While my parents' grandchildren are staying with them for the week of Camp Gramp, the kids have a variety of daily responsibilities:  cleaning their rooms, grooming themselves independently, tidying-up the kitchen and bathroom areas, and completing activities together in a positive way (read: no bickering!!).  We reward these great behaviors along the way by giving out beads.  The coolest beads are reserved for the toughest tasks.

Each year the children collect the beads a little differently. This year we hung our beads on regular shoe lace necklaces.  Last year, we used curly shoe laces and hung them in the bedrooms.  The girls still have theirs hanging up as a fun reminder of Camp Gramp.

Thursday, July 8, 2010

Nail and String Art

When we pick crafts for Camp Gramp, we want them to be fun (of course!), to be useful in some way, and to teach some sort of skill during the process.  Nail and String Art is an oldie but a goodie. I have fond memories of my grandfather giving me a block of wood, a hammer, and some nails when I was bothering him in his workshop back in the '70s.  To a child, it is a great feeling to hammer nails, even if it means hammering fingers every once in a while.  It is the perfect activity to teach physical limitations, empowering the child with ownership over the product and the possible pain.  Surprisingly, there were very few injured fingers when we did this activity at Camp Gramp. Kids learn very quickly how to hammer without hitting a finger.
Having seen this craft a few years ago in Family Fun magazine, all those memories came back to me and I was determined to one day fit this craft into Camp Gramp.  As usual, things don't always go as smoothly as I hope, and this year I was particularly busy during the week before Camp Gramp started.  As a result, on the day of this craft, my father was busy cutting the wood while I was still searching his garage for appropriate nails.  We weren't so well prepared.

But children have a way of surprising everyone.

Even with my extreme lack of preparation --I had given very little thought to how I'd explain the directions; I had no example to show them; I just kind of threw some string, a baby food jar full of nails, and some hammers on the grass and gave a quick speech about making a clock shape with the hammered nails-- the kids took easily to this project.  Even the youngest, age 5, made two of these!
The children didn't seem to need much direction at all.  Each came up with a creative way to wrap the string.  Some wrapped one color in a 'spider web' and then wrapped another color on top to form an initial letter.  Others made circular patterns.  Some made stars.

The finished projects are displayed in their bedrooms.

Wednesday, July 7, 2010

Red, White, and Blue Pretzel Rods

Keep celebrating the USA colors all summer long!  The theme at Camp Gramp this summer was "Stars and Stripes" so for a snack one day, the kids made these pretzel rods.  We melted a large bar of white chocolate in a double-broiler (a bowl of chocolate in a larger bowl of really hot water on the stove top). Then we dipped the pretzel rods into the chocolate, using a spoon to spread the chocolate evenly.  While the chocolate was still wet, we sprinkled red and blue sugar on the pretzels and rested them to cool on parchment paper.  I wrote names on the paper so that we'd know which was which when it came time to eat our snack.

Tuesday, July 6, 2010

Camp Gramp Key Chains

During the week of Camp Gramp, the kids do many crafts.  We try to make the crafts meaningful and useful, so we spend all year in search of the coolest things to make.  This key chain  (found on Ucreate) ranks right up there.  It is useful, and the process teaches the kids how to use a sewing machine. All that is required is a few straight lines of stitching, so the kids are exposed to using the machine without the frustration. (I can't be the only crafter who has to get the sewing machine manual out every time I start a new project!!)
The kids and I started the week with a field trip to JoAnn Fabrics (try taking seven kids into that store...see what happens) so the kids could pick out two long ribbons and one short ribbon.  The longer ribbons were mostly cut to order, so we got each cut to a quarter yard.  A quarter yard was more than enough for one key chain.  For the shorter ribbon that wraps around the key chain in the last step, I encouraged the kids to share spools of thin ribbon.  That required some artistic juggling, but we managed.

First step: sew together the two fat ribbons, using one line of stitching down each side.

Second step: insert the metal key chain (also found at JoAnn Fabrics, in the purse craft section) and sew the ends of the newly stitched fat ribbon together to form a loop that holds the metal key chain.

Third step:  pinch the loop of fat ribbon together, about a quarter-inch above the metal key chain.  Wrap the thin ribbon around this area and sew it securely with two straight stitches along the edges of the thin ribbon.  (This part was tricky for the youngest crafters--due to the thickness of the many ribbon layers-- so I had them depress the sewing pedal while I maneuvered the key chain through the machine.)

Each crafter now has a key chain made to order!